🏗️ Lesson 7.2: Building the Level
Let's construct the arena. This lesson is pure assembly — floor, walls, lighting, player, camera, and stars. Everything here is a skill you already have; now we combine them into a real level.
🎯 Learning Objectives
- Build a floor and four boundary walls
- Place the player and attach movement + follow camera
- Scatter collectible prefabs around the arena
- Organize the Hierarchy so the scene stays tidy
Estimated Time: 45 minutes
Project: A complete, walkable arena full of collectibles.
In This Lesson
The Target
By the end of this lesson your scene will look like this — a bright walled arena with the player and stars ready to collect:
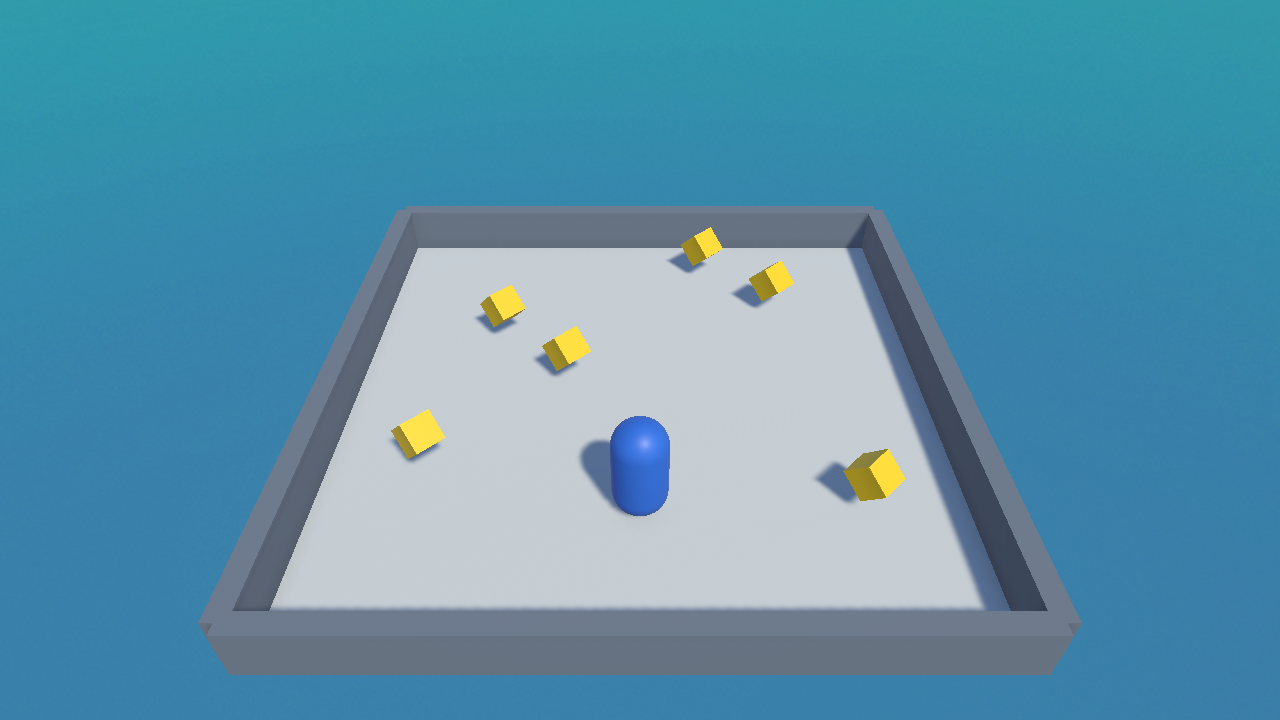
Floor & Walls
- Floor: add a Plane, scale it to about
(1.2, 1, 1.2). Give it a light material. - Walls: add a Cube, scale it long and thin — e.g.
(12, 1, 0.4)— and position it at one edge (Position Z ≈ 6, Y = 0.5). This is one wall. - Duplicate the wall (Ctrl+D) three times; position one at each edge, rotating the two side walls 90°. A grey material suits them.
- Lighting: the scene's Directional Light already lights everything. Rotate it a little for pleasing shadows if you like.
✅ Pro Tip: duplicate, don't rebuild
Ctrl+D duplicates the selected object with all its components and settings. Build one wall perfectly, then duplicate — far faster and more consistent than making four from scratch.
Player & Camera
- Add a Capsule, position it at the centre (Y = 1), rename it
Player, colour it, and tag it Player. - Give it a Rigidbody (needed for star triggers). Under Constraints, freeze rotation X and Z so it can't tip over.
- Attach your
PlayerMovementscript (Module 4). - Attach
CameraFollowto the Main Camera and drag the Player into its Target slot (Module 4).
💡 Reuse, don't rewrite. The movement and camera scripts from Module 4 work here unchanged. Reusing your own code is exactly how real projects grow.
Scattering Stars
- Bring in your Collectible prefab (Module 5).
- Drag it into the arena 6 times, spreading the copies around the floor.
- Keep them inside the walls and off the very centre (where the player starts).
⚠️ Stars falling through / not collecting
Confirm each is a prefab instance with Is Trigger ON and the Collectible script, and that the Player has a Rigidbody and the "Player" tag. This is the same checklist from Module 5.
Keeping It Tidy
Scenes get cluttered fast. Group related objects under empty parent GameObjects so the Hierarchy stays readable:
Floor, Walls] S --> E2[--- Gameplay ---
Player, Collectibles] S --> E3[--- Systems ---
GameManager, Music] S --> E4[Main Camera, Directional Light]
Create an empty GameObject (GameObject ▸ Create Empty), name it --- Environment ---, and drag the floor and walls under it. Future-you will thank present-you.
Hands-on Exercise
🏋️ Exercise: Build the arena
- Build the floor and four walls (duplicate the first wall).
- Add the tagged Player with Rigidbody, movement, and follow camera.
- Scatter 6 collectible prefabs.
- Press Play — drive around and collect every star. Walls should stop you; stars should vanish and score.
- Organize the Hierarchy into Environment / Gameplay / Systems groups.
💡 The player slips through the walls
Walls need colliders (Cubes have Box Colliders by default — don't tick Is Trigger on walls). If moving by Transform, the player can still push through at high speed; keep speed reasonable, or move the player with physics.
🎯 Quick Quiz
Question 1: What's the fastest way to make four matching walls?
Question 2: Why group objects under empty parents in the Hierarchy?
Summary
🎉 Key Takeaways
- Build the floor and duplicate one wall into four (Ctrl+D).
- Add a tagged Player with Rigidbody + movement + follow camera (reused from Module 4).
- Scatter your Collectible prefab around the arena.
- Group objects under empty parents to keep the Hierarchy tidy.
🚀 What's Next?
You can collect stars, but the game never ends. Lesson 7.3 adds win and lose conditions — a real finish line.